In the realm of virtual meetings and conferences, Jitsi Meet has emerged as a popular choice for its simplicity and versatility. With its seamless integration with Dropbox, users can effortlessly save their meetings and access them later for review or sharing. In this comprehensive guide, we’ll walk you through the step-by-step process of saving recordings from Jitsi Meet directly into your Dropbox account.


Understanding Jitsi Meet Recordings
Before delving into the intricacies of saving recordings in Dropbox, it’s essential to grasp how Jitsi Meet handles recordings. When you record a meeting on Jitsi Meet, the platform generates a file in the form of a video recording. This recording encompasses all the audio, video, and shared screen content from the meeting, preserving it for future reference.
Integrating Dropbox with Jitsi Meet
To begin saving your Jitsi recording directly to Dropbox, you first need to integrate your Dropbox account with the platform. Follow these simple steps to accomplish this:
- Access Settings: Log in to your Jitsi Meet account and navigate to the settings section.
- Select Dropbox Integration: Look for the option to integrate with Dropbox and select it.
- Authorize Access: You’ll be prompted to authorize Jitsi Meet to access your Dropbox account. Click on the authorization link and follow the on-screen instructions to grant access.
Enabling Recording in Jitsi Meet
Once you’ve successfully integrated Dropbox with Jitsi Meet, it’s time to enable recording for your meetings. Here’s how you can do it:
- Start a Meeting: Initiate a meeting on Jitsi Meet by either creating a new one or joining an existing session.
- Activate Recording: Within the meeting interface, locate the recording option and activate it. This usually involves clicking on a ‘Record’ button or selecting the recording option from the menu.
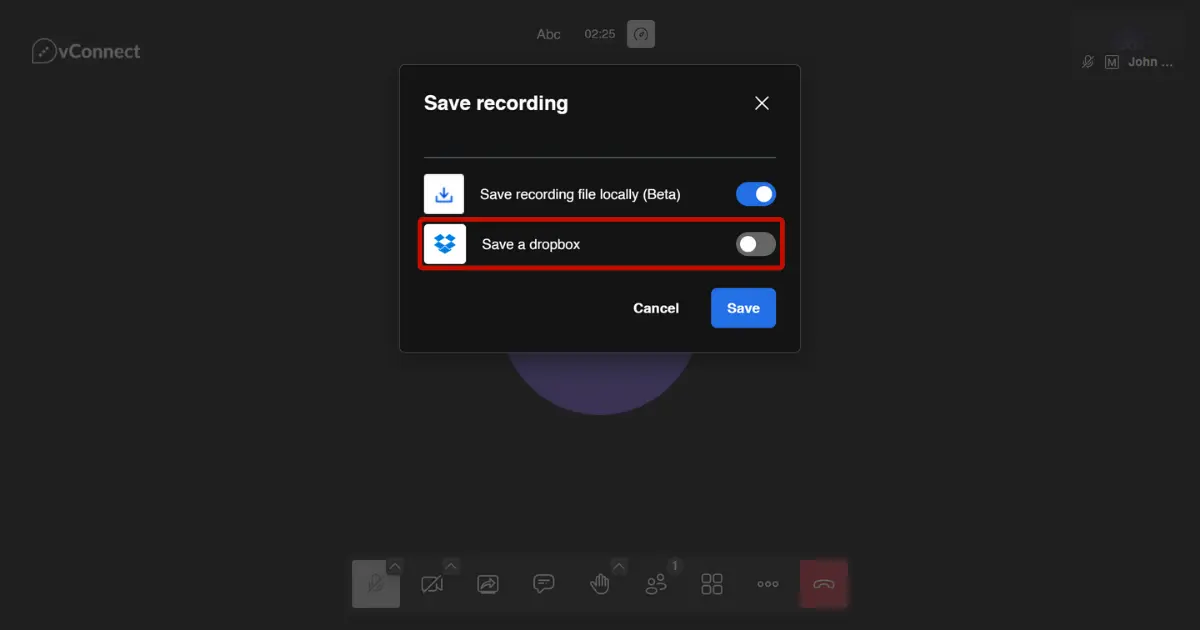
Saving Recordings to Dropbox
Now that your meeting is being recorded, let’s explore how you can save the recording directly to your Dropbox account:
End the Meeting: Once the meeting concludes and you stop the recording, you’ll be prompted with options to save the recording.
Choose Dropbox: Select the option to save the recording to Dropbox. Jitsi Meet will automatically sync with your Dropbox account, allowing you to choose the destination folder for the recording.
Accessing Recorded Meetings in Dropbox
With the recording successfully saved to Dropbox, accessing it is a breeze:
Navigate to Dropbox: Open your Dropbox account either through the web interface or the desktop/mobile app.
Locate Recording: Find the folder where your Jitsi Meet recordings are saved. The recording should be available there, ready for playback or sharing.
Benefits of Using Dropbox for Jitsi Meet Recordings
Integrating Dropbox with Jitsi Meet offers several advantages:
-
Convenient Storage: Dropbox provides reliable cloud storage for your meeting recordings, ensuring they’re safely stored and easily accessible from anywhere.
-
Effortless Sharing: With Dropbox, you can share your meeting recordings with colleagues or clients effortlessly, simply by providing them with the shared link.
-
Organizational Tools: Dropbox’s organizational features, such as folders and tags, make it easy to categorize and manage your Jitsi recording efficiently.
Conclusion
Saving recordings from Jitsi Meet to Dropbox streamlines the process of archiving and sharing valuable meeting content. By following the steps outlined in this guide, you can seamlessly integrate these two platforms, ensuring that your meeting recordings are securely stored and readily available whenever you need them. Embrace the power of Dropbox integration with Jitsi Meet and elevate your virtual collaboration experience to new heights. With Jitsi support, you can enhance your workflow and effortlessly manage your meeting recordings with confidence.
FAQ
Yes, you'll need a free or paid Dropbox account to save recordings directly to your cloud storage.
Absolutely! Jitsi also offers the option to save recordings directly to your local storage.
If your Dropbox is full, the recording won’t be saved. Ensure you have enough space before starting your recording.
Remember to always check the privacy policies and terms of service for both Jitsi Meet and Dropbox to ensure compliance with data handling and storage requirements.
Yes, once your recording is saved in Dropbox, you can download it to your device and use editing software to make any necessary adjustments.
The ability to save recordings in Dropbox may depend on your Jitsi Meet subscription plan and available integrations. Some features may be limited or require additional permissions.


