Table of Contents
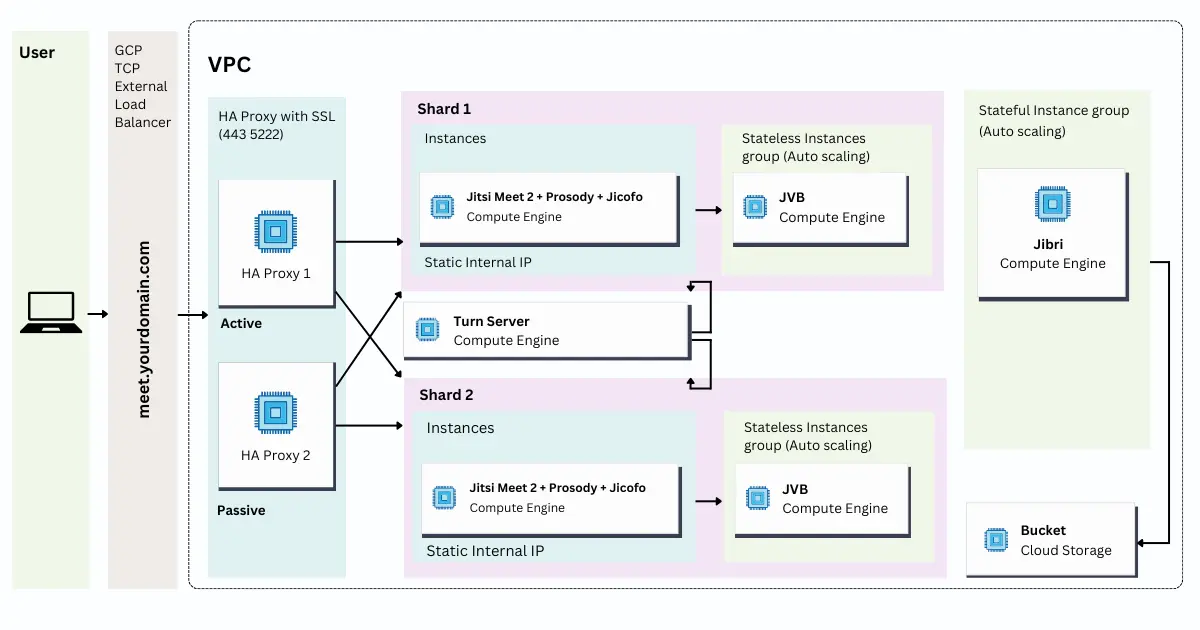
Are you tired of your Jitsi meetings crashing when too many people join? Say goodbye to those frustrating moments! In this guide, we’ll walk you through scaling Jitsi on Google Cloud Platform (GCP) using Terraform. Get ready to host seamless video conferences for hundreds of participants!
What You’ll Learn
- Setting up GCP for Jitsi deployment
- Creating a Terraform script for scalable infrastructure
- Configuring Jitsi for high-performance video conferencing
- Testing and optimizing your scaled Jitsi setup
Prerequisites
- Basic knowledge of Terraform and GCP
- A GCP account with billing enabled
- Terraform installed on your local machine
- Git for version control
Set Up Your GCP Project
- Create a new GCP project or select an existing one.
- Enable the Compute Engine API.
- Create a service account with the necessary permissions.
- Download the JSON key for your service account.
Step 2: Prepare Your Terraform Environment
- Create a new directory for your Terraform project: Copy
mkdir jitsi-scaling && cd jitsi-scaling- Initialize Terraform: Copy
terraform initStep 3: Write Your Terraform Script
Create a file named main.tf and add the following code:
provider "google" {
  credentials = file("path/to/your/service-account-key.json")
  project     = "your-project-id"
  region      = "us-central1"
}

resource "google_compute_instance_template" "jitsi_template" {
  name        = "jitsi-instance-template"
  description = "Jitsi server instance template"

  instance_description = "Jitsi server instance"
  machine_type         = "n1-standard-2"

  disk {
    source_image = "ubuntu-os-cloud/ubuntu-2004-lts"
    auto_delete  = true
    boot         = true
  }

  network_interface {
    network = "default"
    access_config {
      // Ephemeral IP
    }
  }

  metadata_startup_script = file("jitsi_install.sh")

  tags = ["jitsi-server"]
}

resource "google_compute_instance_group_manager" "jitsi_group" {
  name = "jitsi-instance-group"

  base_instance_name = "jitsi"
  zone               = "us-central1-a"

  version {
    instance_template = google_compute_instance_template.jitsi_template.id
  }

  target_size = 2

  named_port {
    name = "http"
    port = 80
  }

  named_port {
    name = "https"
    port = 443
  }
}

resource "google_compute_autoscaler" "jitsi_autoscaler" {
  name   = "jitsi-autoscaler"
  zone   = "us-central1-a"
  target = google_compute_instance_group_manager.jitsi_group.id

  autoscaling_policy {
    max_replicas    = 10
    min_replicas    = 2
    cooldown_period = 60

    cpu_utilization {
      target = 0.7
    }
  }
}

resource "google_compute_global_address" "jitsi_ip" {
  name = "jitsi-global-ip"
}

resource "google_compute_global_forwarding_rule" "jitsi_forwarding_rule" {
  name       = "jitsi-forwarding-rule"
  target     = google_compute_target_http_proxy.jitsi_proxy.id
  port_range = "80"
  ip_address = google_compute_global_address.jitsi_ip.address
}

resource "google_compute_target_http_proxy" "jitsi_proxy" {
  name    = "jitsi-http-proxy"
  url_map = google_compute_url_map.jitsi_url_map.id
}

resource "google_compute_url_map" "jitsi_url_map" {
  name            = "jitsi-url-map"
  default_service = google_compute_backend_service.jitsi_backend.id
}

resource "google_compute_backend_service" "jitsi_backend" {
  name        = "jitsi-backend"
  port_name   = "http"
  protocol    = "HTTP"
  timeout_sec = 10

  health_checks = [google_compute_health_check.jitsi_health_check.id]

  backend {
    group = google_compute_instance_group_manager.jitsi_group.instance_group
  }
}

resource "google_compute_health_check" "jitsi_health_check" {
  name               = "jitsi-health-check"
  check_interval_sec = 5
  timeout_sec        = 5

  http_health_check {
    port = 80
  }
}Step 4: Create the Jitsi Installation Script
Create a file named jitsi_install.sh with the following content:bash Copy
#!/bin/bash
apt-get update
apt-get install -y apt-transport-https
apt-add-repository universe
apt-get update
apt-get install -y jitsi-meet
Step 5: Apply Your Terraform Configuration
Run the following commands: Copy
terraform plan
terraform apply
Step 6: Configure Jitsi for High Performance
SSH into one of your Jitsi instances and modify the /etc/jitsi/meet/your-domain-config.js file: javascript Copy
config.enableLayerSuspension = true;
config.enableLipSync = false;
config.disableAudioLevels = true;
config.disableSimulcast = false;
Step 7: Test and Optimize
- Conduct a stress test using tools like JMeter or Gatling.
- Monitor CPU and memory usage in GCP Console.
- Adjust the autoscaling policy if needed.
Congratulations! You’ve successfully scaled Jitsi using Terraform on GCP. Enjoy your high-capacity video conferences!
FAQ
Depending on your configuration, this setup can support hundreds of concurrent users.
While this tutorial is specific to GCP, you can adapt the concepts for other cloud providers like AWS or Azure.
Yes, but you should implement additional security measures like SSL certificates and firewall rules.
Costs will vary based on usage, but you can use GCP's pricing calculator for estimates.
Absolutely! You can modify the jitsi_install.sh script to include additional configurations or plugins


