Table of Contents
- What You’ll Learn
- Step 1: Understanding Jitsi’s Scaling Requirements
- Step 2: Setting Up Your AWS Environment
- Step 3: Installing and Configuring Terraform
- Step 4: Writing Terraform Scripts for Jitsi Scaling
- Step 5: Deploying Your Scaled Jitsi Infrastructure
- Step 6: Managing and Monitoring Your Jitsi Infrastructure
- Conclusion
Are you looking to scale your Jitsi Meet infrastructure to handle more concurrent users? Look no further! This comprehensive guide will walk you through the process of scaling Jitsi using Terraform scripts on Amazon Web Services (AWS). Whether you’re a seasoned DevOps engineer or just getting started with cloud infrastructure, this tutorial has got you covered.
What You’ll Learn
Before we dive in, make sure you have:
- An AWS account with appropriate permissions
- Basic knowledge of Terraform and Infrastructure as Code (IaC)
- Familiarity with Jitsi Meet
Step 1: Understanding Jitsi’s Scaling Requirements
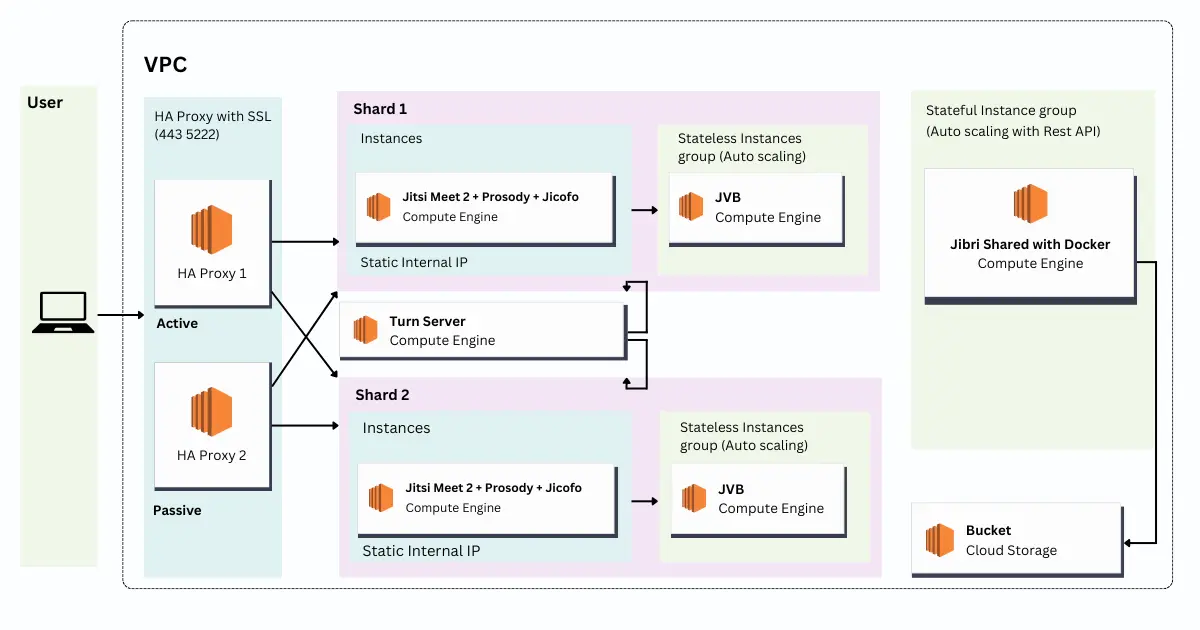
Jitsi Meet is an open-source video conferencing solution that can handle a significant number of concurrent users. However, as your user base grows, you’ll need to scale your infrastructure to maintain performance. The key components to scale include:
- Jitsi Videobridge (JVB)
- Jicofo (Jitsi Conference Focus)
- Prosody XMPP server
Step 2: Setting Up Your AWS Environment
- Log in to your AWS Management Console
- Create a new VPC for your Jitsi infrastructure
- Set up security groups and IAM roles
Step 3: Installing and Configuring Terraform
- Download and install Terraform from the official website
- Set up AWS credentials in your local environment
- Initialize a new Terraform project directory
Step 4: Writing Terraform Scripts for Jitsi Scaling
Create a main.tf file with the following structure:
# Provider configuration
provider "aws" {
  region = "us-west-2"
}

# VPC and networking resources
resource "aws_vpc" "jitsi_vpc" {
  # VPC configuration
}

# EC2 instances for Jitsi components
resource "aws_instance" "jvb" {
  # JVB instance configuration
}

resource "aws_instance" "jicofo" {
  # Jicofo instance configuration
}

resource "aws_instance" "prosody" {
  # Prosody instance configuration
}

# Auto Scaling Group for JVB
resource "aws_autoscaling_group" "jvb_asg" {
  # Auto Scaling Group configuration
}

# Load Balancer
resource "aws_lb" "jitsi_lb" {
  # Load Balancer configuration
}
Step 5: Deploying Your Scaled Jitsi Infrastructure
- Run terraform init to initialize your Terraform working directory
- Execute terraform plan to preview the changes
- Apply the changes with terraform apply
Step 6: Managing and Monitoring Your Jitsi Infrastructure
- Set up CloudWatch alarms for key metrics
- Implement log aggregation using CloudWatch Logs
- Regularly review and optimize your infrastructure
Conclusion
Congratulations! You’ve successfully scaled your Jitsi Meet infrastructure using Terraform on AWS. This setup will allow you to handle a larger number of concurrent users while maintaining performance and reliability.
Remember to regularly update your Jitsi components and Terraform scripts to ensure you’re running the latest versions with all security patches.
FAQ
The exact number depends on your specific configuration, but this setup can typically support hundreds to thousands of concurrent users.
While this script is specific to AWS, you can adapt the concepts to other cloud providers with some modifications.
It's recommended to check for updates at least monthly and apply security patches as soon as they're available.
Costs vary based on usage and specific AWS resources, but you can use the AWS Pricing Calculator to get an estimate for your expected load.
Yes, Jitsi supports various authentication methods, which you can configure in your Prosody XMPP server.


